 VeritellCaregiver resources
Our story / The last straw
Why we turned it on for my mom.
My mom has used an iPhone for years. Then the charges started: a “phone cleaner” app that cost 99 cents to try, then renewed at $19.99 a week, which is more than $80 a month, for a service she did not need. Her phone had plenty of free storage. We cancelled the subscription and asked Apple for a refund.
That was the last straw. The confusing screens and the apps that kept disappearing were one thing. A phone that could quietly sign her up for things was another. So we turned on Assistive Access, and this guide is what I wish I had read first.
If you are here, you probably have your own version of the last straw. It does not mean your parent is failing, and it does not mean you have to take the phone away. It usually means the phone is doing more than they need it to.
01 / The basics
What Assistive Access is.
Assistive Access is a mode built into every iPhone running iOS 17 or later. Apple designed it for people with cognitive disabilities, and it works well for anyone who finds the standard iPhone too busy. When it is on, the phone shows:
- A Home Screen with only the apps you chose, as large buttons in a grid or a list.
- A big Back button at the bottom of every screen, so there is always a way out.
- Simplified versions of Calls, Messages, Camera, Photos, Music, Magnifier, and the Apple TV app, with larger text and fewer options.
- Calls and messages limited to the people you choose, if you want that.
- No App Store and no Settings app, and no way to change any of this without a passcode you set.
If you remember the Jitterbug, the flip phone with big buttons and short menus made for older adults, Assistive Access turns an iPhone into something close to a modern equivalent, without the live operator service. It is not a different phone, and it is not permanent. You can exit Assistive Access with the passcode, change what is inside, or turn it off entirely. Everything on the phone, including photos, messages, and contacts, stays where it was.
02 / The decision
Is it the right fit?
It tends to help when…
- They mostly call, text, and look at photos, and the rest of the phone gets in the way.
- They keep ending up on screens they cannot get out of, or apps keep moving and disappearing.
- Pop-ups, ads, and “your phone is infected” scare messages are leading to taps and charges.
- You already fix the phone when something goes wrong, and you can hold the passcode.
It may frustrate when…
- They still bank, browse the web, email, or use apps that need to work exactly as before. Those apps can be added, but they look and behave as they normally do, just smaller, with a Back button underneath.
- They rely on voicemail, recent calls, or notifications from many apps. Those work differently in this mode and need setup.
- They would experience the change as a loss of independence rather than a relief. Talk it through first.
- They need Emergency SOS via satellite, which is not available in this mode.
Try these first, if the problem is smaller
- Bigger, bolder text. Settings > Accessibility > Display & Text Size.
- A tidier Home Screen. Move the apps they use to the first screen and the Dock. Move the rest off.
- Fewer interruptions. Turn off notifications for apps that do not matter.
- One-tap people. Add the people they call to Favorites in the Phone app.
- A lock on new apps and purchases. A Screen Time passcode, covered in the next section.
These are enough for some families. If they are not, Assistive Access is the bigger step.
03 / The money problem
Stop the subscription traps.
The app that caught my mom is part of a pattern security researchers call fleeceware: a free or 99-cent trial that lasts a few days, then a weekly charge that is many times the price of a normal app, often continuing after the app is deleted. These apps tend to advertise with alarming claims about viruses or full storage. An iPhone does not need a cleaner app, and Apple’s rules prohibit misleading subscriptions, yet they keep showing up. Here is what to do, in order.
1. Find and cancel what is already running
On their iPhone, open Settings, tap their name at the top, then tap Subscriptions. Cancel anything you do not recognize. Deleting an app does not cancel its subscription, and cancelling does not refund charges already made. Only the account holder can cancel, so this happens on their phone or while signed in to their Apple Account. If you cannot find the charge, search their email for “receipt from Apple” to see which account was billed, and look on the card statement for lines labelled APPLE.COM/BILL.
2. Ask Apple for a refund
Go to reportaproblem.apple.com, sign in with their Apple Account, choose the option to request a refund, pick a reason, select the charge, and submit. Apple says to expect an update within 24 to 48 hours. It decides case by case, so ask even if you are not sure it will be approved; the subscription stays cancelled either way. A charge that is still pending cannot be refunded until the receipt arrives.
3. Make sure it cannot happen again
The lighter option is a Screen Time passcode on their phone. I tried this first and got stuck, so here is the trick: in the US, Family Sharing only lets you manage Screen Time for members under 18, so you will not find a way to do it for a parent from your own phone. Instead, set it up on their phone and keep the passcode yourself.
- On their iPhone, go to Settings > Screen Time > Manage Screen Time > Lock Screen Time Settings, and create a four-digit passcode. Set up Screen Time Passcode Recovery when it is offered.
- Then go to Settings > Screen Time > Content & Privacy Restrictions, turn it on, tap iTunes & App Store Purchases, and block installing apps, deleting apps, and in-app purchases.
- Menu names shift between iOS versions. Look for the App Store or purchases section under Screen Time. Ask to Buy, Apple’s purchase-approval feature, does not work for adults.
The bigger option is Assistive Access. The App Store cannot be added to Assistive Access at all, so no new apps can be installed without exiting with the passcode. Apps you do add still work the way they normally do, including any purchases offered inside them, so remove the apps you do not trust before you start and keep the Screen Time purchase block on as well. For my mom, closing the door on new apps was the deciding reason.
A pop-up that says the phone has viruses or is out of storage. A free or 99-cent trial that lasts a few days. A price per week rather than per month or year. A cancel button that is hard to find.
With the charges stopped, the rest of this guide is about Assistive Access itself.
04 / Back to Assistive Access
Setting up Assistive Access, step by step.
If you have decided Assistive Access is the right fit, here is how to turn it on. Setup takes about 20 minutes, and most of it is making decisions. You will want their iPhone, their device passcode, and ideally their Apple Account password. If the phone is new, finish the normal setup first. Update to the latest iOS while you are at it.
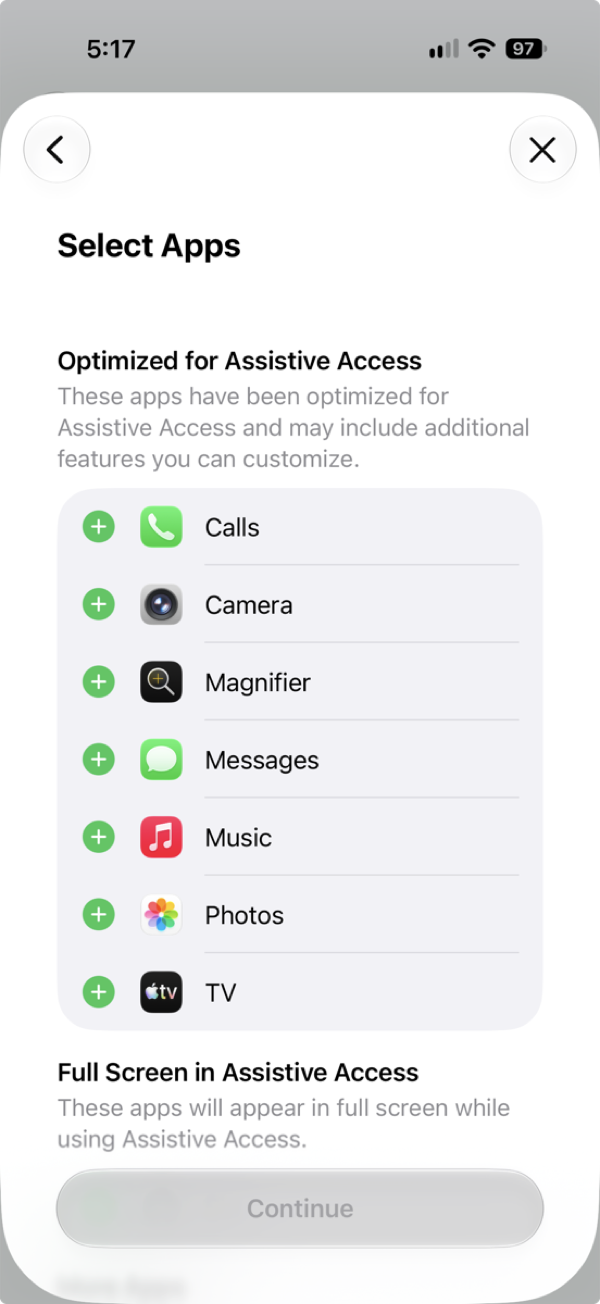
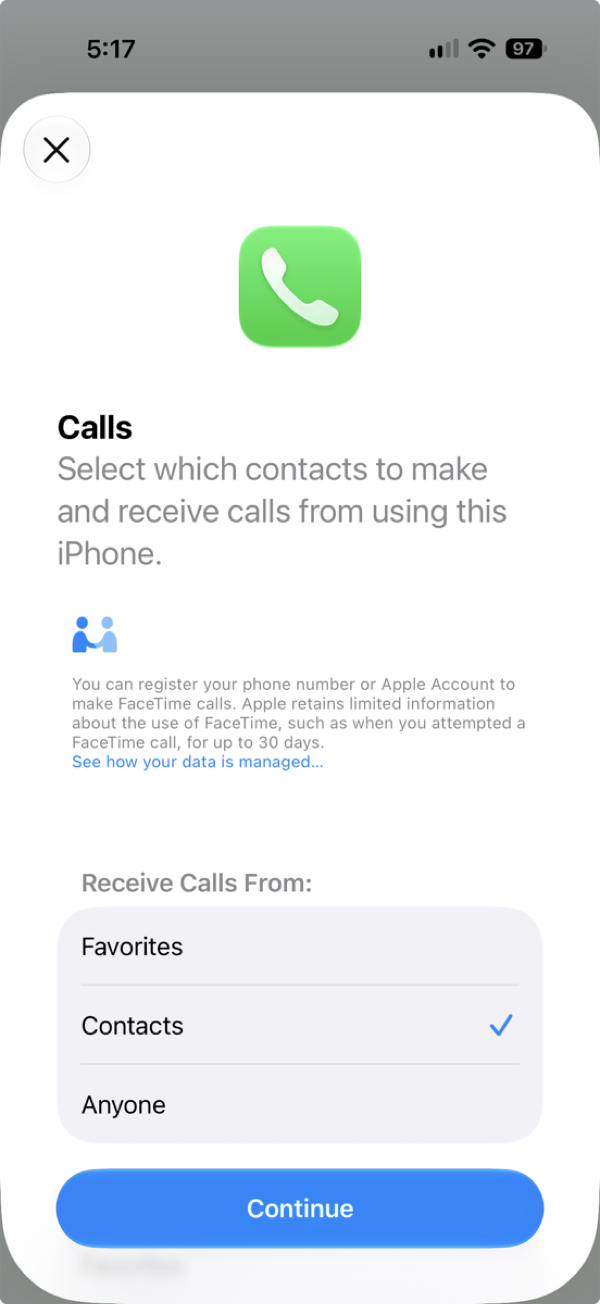
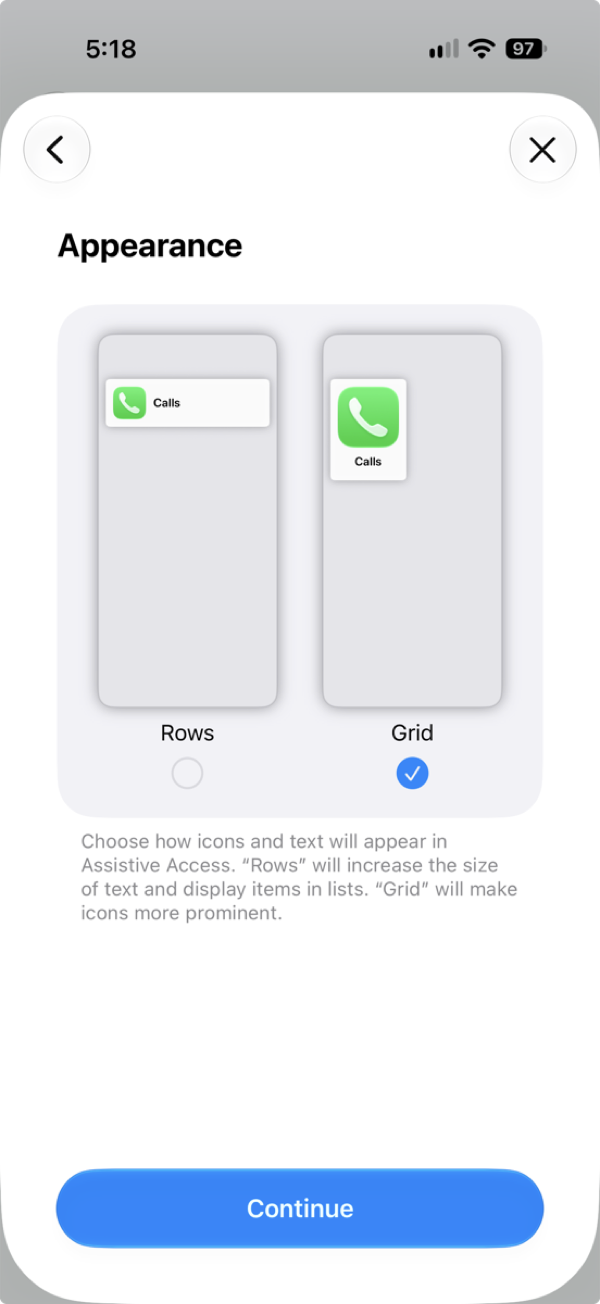
- Start. Open Settings > Accessibility, scroll to the bottom, tap Assistive Access, then Set Up Assistive Access.
- Check the Apple Account. It should be theirs, not yours. If the phone is signed in to the wrong account, change it here. If it is not signed in at all, you can skip this step.
- Choose the apps. Tap the plus next to each app to include it. Calls, Messages, Camera, Photos, Music, Magnifier, and Apple TV get simplified designs. Most other apps can be added too, in their normal form. Start small; you can add more later.
- Set each app’s options. For Calls and Messages, decide who they can reach and who can reach them. The choices are Favorites, Contacts, or Anyone, set separately for receiving and making calls. Favorites appear as big buttons on the first screen. For Messages, choose whether they type on a keyboard, send emoji only, or record a video selfie, and whether tapping a message reads it aloud.
- Pick the layout. Rows is a list. Grid is big tiles with images. Grid suits people who recognize faces and icons faster than words.
- Confirm the device passcode and Face ID or Touch ID. Assistive Access uses their existing lock. If they struggle with the passcode, this is the moment to simplify it or set up Face ID.
- Create the Assistive Access passcode. This is a separate code that enters and exits the mode and changes its settings. You will be the one using it, so write it down somewhere safe.
- Add a recovery Apple Account. Apple offers to let a second Apple Account, which can be yours, exit the mode and reset the passcode. Do this. Apple’s warning is blunt: without it, a forgotten passcode means resetting the whole phone.
- Start it. Tap Start Using Assistive Access and enter the passcode. To leave at any time, triple-click the side button (or the Home button on older models), tap Exit Assistive Access, and enter the passcode.
Changing things later. Exit Assistive Access, then go to Settings > Accessibility > Assistive Access. Manage Apps adds, removes, and reorders apps. Each app’s name opens its options. Passcode Settings changes the code. Reset starts over without deleting photos, messages, or music.
05 / Before you turn it on
Eight things to sort out first.
- Decide it together. Describe it as fewer buttons, not fewer abilities. Let them choose the layout and the wallpaper. A change made with someone tends to stick. A change made to someone often gets resented.
- Set up account recovery before anything else. Make sure their Apple Account has a trusted phone number you can answer (Settings > their name > Sign-In & Security > Two-Factor Authentication), add yourself as a Recovery Contact, and record the Apple Account email, device passcode, Assistive Access passcode, and Screen Time passcode in one private place. Locked-out phones are the most common disaster in the caregiver forums, and every fix needs these. Our Apple Account recovery guide walks through each step and has a record sheet.
- Make a plan for missed calls and voicemail. Assistive Access does not show missed-call badges unless you turn on Notifications in its settings. Recents and voicemail inside the Calls app are options you switch on for that app. If you allow calls from all contacts only, calls from a new number will not come through, so save the pharmacy, the clinic, and anyone else who must reach them in Contacts first. If you allow favorites only, saving them in Contacts is not enough: add them as Favorites in the Calls setup as well.
- Know how emergency calls work. They can still call emergency services from inside Assistive Access, even when the phone is locked. Triple-clicking the side button opens the same menu you use to exit and change settings; Emergency is one of its options, and it does not ask for the passcode. Tap it and dial. Crash Detection keeps working. Emergency SOS via satellite and other automatic emergency dialing are not available in this mode, and texting emergency services needs the number added as an allowed Messages contact.
- Expect to handle updates and verification codes. There is no Settings app and no update prompt inside Assistive Access, so iOS updates are now your job: exit, update, re-enter. Verification codes sent to their phone may be hard to see in this mode. Adding your own number as a trusted phone number on their Apple Account gives you a second way to receive them; the recovery guide shows how.
- Decide what happens to health and medication tools. If they use the phone for medication reminders, patient-portal messages, or telehealth video visits, decide how each will work. Apps that are not designed for Assistive Access can still be added, but they look normal and small, and alerts are limited to badges and sounds. Some families move those jobs to the caregiver’s phone instead. Test each one before you rely on it.
- Remember what changes quietly. Apps will not ask permission for location, photos, or contacts inside the mode; those are set during setup. Status icons for the network, Bluetooth, and Focus are hidden. Battery level, the time and date, notification badges, and Siri are off unless you turn them on, and those switches are not in the setup assistant: after setup, exit Assistive Access and look under Settings > Accessibility > Assistive Access. Volume, brightness, text size, and Dark Mode are adjustable from the triple-click Settings screen with the passcode.
- Treat it as a trial. Nothing here is permanent. Agree on two weeks, keep the passcodes handy, and plan to adjust. Many families end up adding an app or widening who can call.
06 / After the switch
The first two weeks: what to check.
- Can they answer a call and call you back without help?
- Do they know the Back button gets them out of anything?
- Did anything they depend on disappear: a game, a radio app, a bank, a church livestream?
- Does the ringer behave: volume, the silent switch, and the Lock Screen?
- Did anyone important get blocked from calling or texting?
- Have you exited and re-entered yourself, so you know the passcode works?
- Have you checked their subscriptions one more time?
“I set the phone up so it only shows the things you use. If something you want is missing, tell me and I’ll add it back.”
07 / A quiet observation
When it is worth mentioning to the care team.
Trouble with a phone someone has used for years can have ordinary causes: a new iOS layout, smaller type, a cracked screen, hearing loss, a tremor. It can also be an early sign of a change in memory, vision, or attention that a clinician would want to know about. You do not need to decide which. Write down what you have noticed, when it started, and what changed, and raise it at the next visit as an observation. If the change was sudden, call the care team rather than waiting.
Our appointment guide has a one-page worksheet for exactly this kind of conversation.
Veritell / Fill in before you start
Assistive Access planning sheet
Print this blank page and fill it in by hand. It will hold passcodes, so keep the completed sheet somewhere private. Nothing you write on paper is sent to this website.
Before you start
□ Subscriptions reviewed; unwanted ones cancelled □ Untrusted apps deleted □ Refund requested, if needed □ iOS updated
□ Trusted phone number I can answer □ Recovery Contact added □ Pharmacy, clinic, and neighbors saved in Contacts
Keep private: account and passcodes
Apple Account email · Device passcode · Assistive Access passcode · Recovery Apple Account · Screen Time passcode, if used
Apps to include
Start small. Calls, Messages, Camera, Photos, Music, Magnifier, and Apple TV have simplified designs; other apps appear in their normal form.
Who they can call and text
Calls: receive from / make to → anyone · all contacts · favorites only Messages: same choice. Favorites to add:
Options chosen
□ Grid □ Rows □ Missed-call badges □ Recents & voicemail □ Keypad □ Speaker Messages: □ Keyboard □ Emoji □ Video selfie □ Tap to hear
□ Siri allowed □ Battery shown □ Time & date shown □ Wallpaper chosen with them
Things that need a plan
Medication reminders · portal messages · telehealth · bank · anything they would miss
Two-week check
□ Can call me back □ Knows the Back button □ Nothing important missing □ Ringer behaves
□ Nobody important blocked □ I tested exit and re-entry □ Subscriptions re-checked
Did this help you decide what to do?
Help us improve this guide.
When you are the one holding everything together
Get to know Veritell.
If you are managing a parent’s phone, chances are you are also managing their patient portals, medication lists, and appointment notes. Veritell brings connected health records together in one place and explains them in plain language, so the next appointment starts with a clearer picture. If that sounds useful, you can ask to join the free iPhone and Mac beta.
Opens your email app. Send the message to request access. If it doesn’t open, email [email protected] and mention “iphone-assistive-access-v1.” Please don’t include health information.
Sources & scope
This guide is written from one family’s experience and Apple’s public documentation. It is general information, not advice from Apple, and Apple has not reviewed or endorsed it. Menu names and features change between iOS versions. The steps were checked against Apple’s Assistive Access User Guide for iPhone in October 2026, and the screenshots are from the setup assistant on an iPhone running iOS 27 at that time; when the phone in front of you differs, follow what you see on the phone.
- Apple: Assistive Access User Guide for iPhone, including the pages on setup, Calls, Messages, settings, entering and exiting, managing apps, and differences from standard iPhone use
- Apple: Cancel a subscription from Apple and Request a refund for apps or content that you bought from Apple
- Apple: Create, change, or remove a Screen Time passcode on iPhone and Change settings and restrictions in the App Store on iPhone
- Apple: Set up an account recovery contact
- Avast: Fleeceware apps on mobile app stores, on the trial-then-weekly-charge pattern
Jitterbug is a trademark of its owner, Lively; Veritell is not affiliated with or endorsed by Lively or Apple.
Nothing here is medical advice. For a sudden change in someone’s ability to manage everyday tasks, contact the care team. In an emergency, call your local emergency number.
Editorial contact: [email protected]. Please flag confusing or outdated steps without including personal details.